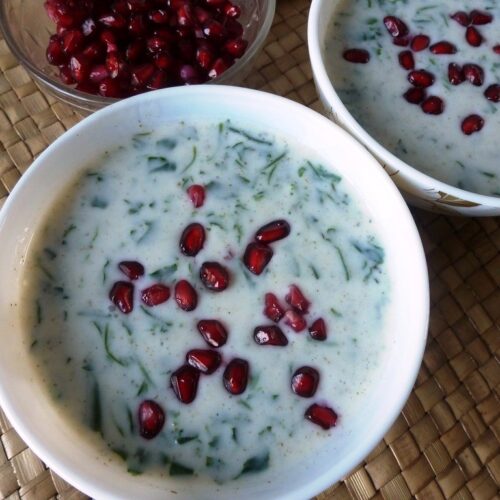
Healthy Bathua Raita | Easy Raita Recipe With Chenopodium – is a winter special side dish made with curd, bathua leaves and a few spices. It is full of nutrition and provides warmth to our bodies. Let’s see step by step preparation of this delicious healthy bathua raita with pictures.

About Bathua raita
Bathua raita is a refreshing curd dish very easy to prepare. It will be ready in under 15 minutes. Serve bathua raita as a side dish along with stuffed paratha, plain paratha, puri, pulao, biryani, etc.
Bathua is known as chenopodium in English and its raita is also called curd chenopodium dip. We can use bathua in the making of bhaji, paratha, mathri, raita, etc.
- About Bathua raita
- Ingredients used for making Healthy Bathua Raita | Easy Raita Recipe With Chenopodium
- Health benefits of eating bathua
- FAQs
- Step by step preparation of Healthy Bathua Raita | Easy Raita Recipe With Chenopodium
- Serving suggestions
- You may also like
- Tips and tricks
- Recipe card
- Healthy Bathua Raita | Easy Raita Recipe With Chenopodium
- My latest recipe
Other curd recipes you would like to try
Mint Masala Lassi / Pudine Wali Thandi Chaas
Quick Raita Made With Bottle Gourd | Ghia Ka Raita
Easy And Creamy Strawberry Smoothie
Ingredients used for making Healthy Bathua Raita | Easy Raita Recipe With Chenopodium
Bathua leaves– first pluck leaves and discard the stem. Wash with water a few times to clean dirt and then finely chop them. Boil in the water till the leaves become soft and then drain water and let it cool.
Curd – use homemade fresh curd or market bought. If the curd is thick add some milk instead of water to give it a more creamy texture.
Spices– A teaspoon of all purpose masala is used which contains black salt, cumin seeds powder, black pepper powder and dry mint gives a nice spicy taste. You can also add the tempering of oil and rai to the raita to enhance its flavour.
Sugar– I have added a little sugar in the raita. It enhances the flavour of raita but it totally optional. If you don’t like can skip this step.
Health benefits of eating bathua
- Winters are the season of green vegetables. They are very tasty and have a lot of health benefits. Bathua is a warm green vegetable and full of nutrients.
- Bathua is a rich source of iron. It is a great home remedy to improve iron levels if someone is anaemic.
- Low in calories and high in fibre they are good for improving gut health.
- It is helpful in cell repair and its proper functioning.
- But also keep in mind that eating in a large amount can also cause diarrhoea or stomach related issues.
- Pregnant ladies should also avoid bathua in their diet as it can cause miscarriage.
- Also, helps in the strengthening of hair.
Click here to check more benefits of bathua leaves.

FAQs
Can we store boiled bathua leaves?
I will suggest that if you boiled a large amount of bathua leaves then your requires. You can squeeze out extra water and cool it completely. Then stores it in an airtight container in the refrigerator. It will stay good for 2-3 days. Take out the amount you needed and add it to the curd and enjoy. Keep the rest in the refrigerator till needed.
Step by step preparation of Healthy Bathua Raita | Easy Raita Recipe With Chenopodium
- First, clean, wash and drain out extra water from bathua leaves. Then finely chop it and put aside.


2. Now boil some water in a sauce pan. Add bathua leaves and continue boil it for 4-5 minutes.


3. Strain water and let it cool completely.
4. Once it cool down completely keep it in the refrigerator for 1-2 hours.
5. Add fresh curd in to a bowl, add boiled and cooled bathua leaves, sugar and all purpose salt mixture. mix well till all blend together nicely.


6. Finally, garnish with pomegranate seeds. Serve with meal or enjoy it as a mid morning snacks.

Serving suggestions
Especially in winters, bathua raita can be served with roti, dal or sabji at lunchtime. It is a good accompaniment for stuffed paratha, plain paratha, puri, pulao, biryani, khichdi, etc.
You may also like
Punjabi Style Choley Masala / Spicy Masala Chole Recipe / Pindi Choley Masala
Pan-roasted vegetable sauce macaroni pasta
Paneer And Coriander Paratha/Protein-rich Paratha Recipe
Whole Wheat Egg Free Coconut Cookies(No Baking Powder or Baking Soda)
Veg Cutlet In Two Ways | Mix Veg CutletHomemade Flavoured Chocolate (With And Without Chocolate Mold)
Tips and tricks
- Always use fresh curd for making raita. It gives the best taste and texture.
- I have used chopped bathua for making raita but some people make a puree of bathua after boiling and then add to the curd. But I like this way as it gives a crunchier texture and taste. If you like the other way then try that one.
- Do not throw away the squeezed water. It is very rich in minerals and can be added to the dal curry, making dough. Or use it for washing your hair.
- You can also add a tempering made with cumin seeds and heeng and just add on the top just before the serving to give a different taste. For this first, heat 1 tsp desi ghee in a pan, add 1/2 tsp cumin seeds and a pinch of heeng powder. Pour this tadka mixture over the raita just before serving.
- If you like spicy raita then add some chopped green chillies to it.
Recipe card

Healthy Bathua Raita | Easy Raita Recipe With Chenopodium
Ingredients
- 100 gm bathua
- 300 ml curd made with toned milk
- 1 tsp all purpose salt mixture
- ½ tsp sugar
- 2-3 tbsp pomegranate seeds for garnishing
Instructions
- First, clean, wash and drain out extra water from bathua leaves. Then finely chop them and put aside.
- Now boil some water in a sauce pan. Add bathua leaves and continue boil it for 4-5 minutes.
- Strain water and let it cool completely.
- Add fresh curd in to a bowl, add boiled and cooled bathua leaves, sugar and all purpose salt mixture. mix well till all blend together nicely.
- Finally, garnish with pomegranate seeds. Serve with meal or enjoy it as a mid morning snacks.
Video
Notes
My latest recipe
Try this yummy and delicious healthy bathua raita recipe, take a picture and tag it #healthicallykitchen on Instagram. Or, save it for later on Pinterest. I love to see them. Happy cooking!
If you like this recipe, don’t forget to share it with your friends and family, and give us a 5 star rating.


