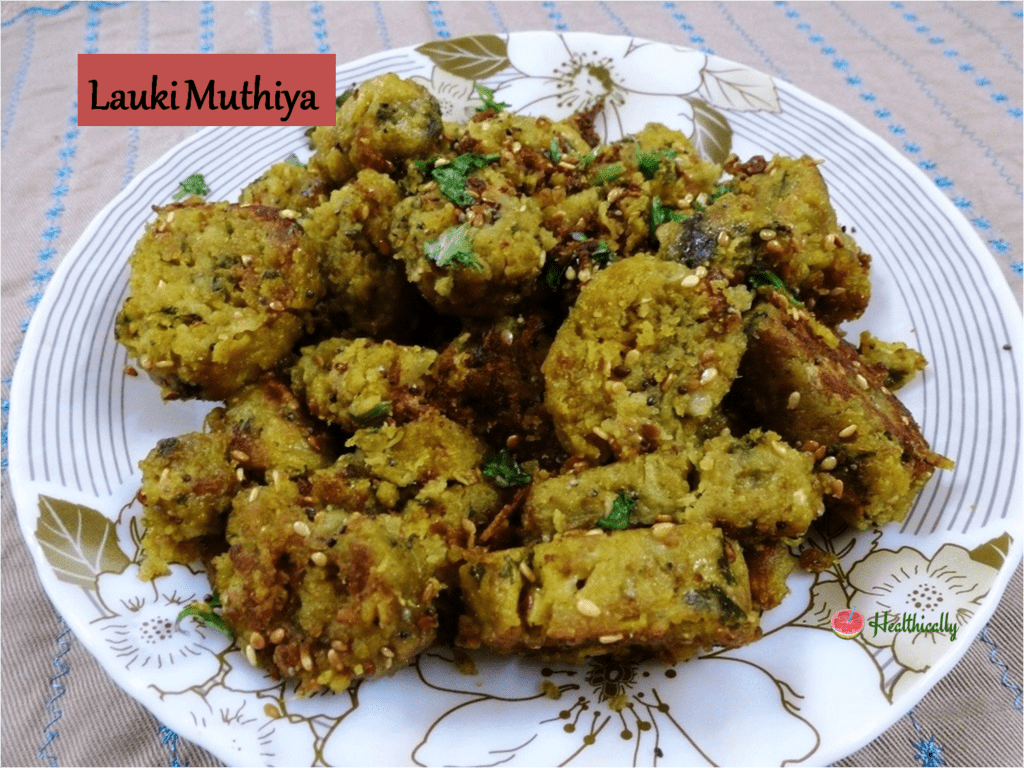
Lauki muthiya recipe / no onion no garlic doodhi muthia recipe . A traditional Gujarati snack recipe made with lauki, multigrain flour, besan, suji and some spices. Made by steaming method and not deep frying this Lauki muthia is a healthy snack recipe.

Lauki muthiya recipe / no onion no garlic doodhi muthia recipe. Served them as a snack, a side dish or for breakfast. They are very filling and nutritious. Similar to other traditional Gujarati snack, lauki muthiya is also made with besan or chickpea flour. It provides a unique nutty taste to this snack.
Lauki muthiya are prepared only using lauki and flour mixture. There are other variations of muthiya too like palak lauki muthiya, mix veg muthiya, methi muthiya, cabbage muthiya etc. We can also use different flour to make it gluten-free or for use during fasting time.
My other snacks recipe you would like to try
Instant and colourful veg idli made with suji
Crispy Aloo Tikki Stuffed With Moong Dal
Simple Oats Wheat Flour Biscuit | Oatmeal Cinnamon Biscuit
How to Make Heeng Jeera Masala Peanuts / Quick Masala Peanuts
Instant Rava Handvo | How to Make Suji Oats Veg Handvo
Serve this with green chutney or tomato sauce at evening time or for breakfast. It is a good option for kid’s tiffin.
As in traditional Gujarati recipes, a small quantity of sugar is added. I have not added any sugar to it because I like it with a strong savoury taste. However, addition of sugar is totally optional and depends upon your taste buds.
Main ingredients used in making of Lauki muthiya recipe / No onion no garlic doodhi muthia recipe
- Lauki
- Multigrain flour
- Besan
- Suji
- Spices
- Oil
- Baking soda
- Sesame seeds and coriander leaves for garnishing
Step by step preparation of Lauki muthiya
1.In a big bowl add multi grain flour, besan, suji, grated lauki, salt, saunf powder, cumin seeds powder, heeng, turmeric powder, ginger green chilli paste, oil, coriander leaves, baking soda.
2. Mix gently and make a medium soft dough. If lauki is fresh and soft you do not need to add any water in it. But if lauki does not contain enough moisture add little water according to the requirement.
3.Divide the dough and make 3 logs of 5-6 inch long out of it. Grease a plate and place the logs on it and then put in the steamer with boiling water.
4.Steam it on high flame for about 20-25 minutes.
5.To check if they are done you can touch the surface if it non stick means they are cooked well. You can also insert knife or tooth pick to check if they are cooked from inside too. A clean knife or toothpick is the indication of well cooked log. Switch off the flame and let them cool.
6. Once cool down, cut them into ½ inches slice sand put them aside.
7. Now in a pan add oil, mustard seeds and til seeds. Then add salt and muthiya slice and gently mix them.
8. Cover the pan and cook it for 2-3 minutes on a low flame. You can flip them in between for proper cooking.
9. Finally add dry mango powder and garnish with coriander leaves. Transfer to a plate and serve warm. ENJOY!

Serving suggestion
Serve doohi muthiya as a snack with green chutney in evening time or for breakfast. They can be packed in the kid’s tiffin for lunch too.
You may also like
Baked Corn Nachos / Homemade Nachos chips / Yellow Corn Chips
Indian Style Mexican Spicy Salsa Dip / Homemade Fresh Tomato Salsa
Ghia ke Kofte / Ghiya Kofta Curry Recipe / Lauki Recipe
Eggless Tutti Frutti Bread | Tootti Frooti Sweet Bread With Whole Wheat
Pan-roasted vegetable sauce macaroni pasta
Paneer And Coriander Paratha/Protein-rich Paratha Recipe
Whole Wheat Egg Free Coconut Cookies(No Baking Powder or Baking Soda)
Veg Cutlet In Two Ways | Mix Veg Cutlet
Tips and tricks
- Grate lauki just before adding into flour mixture because it becomes dark colour after reacting with air.
- Don’t add water in the beginning as lauki is a water-rich vegetable. It releases juices when we add salt and spices to the mixture.
- Do not leave the dough , make logs and put them in the steamer quickly.
- We can eat muthiya right after steaming but tempering it with a little oil and mustard seeds improves its taste and make it a little crispy.
- Do not skip baking soda as it gives it a light and fluffy texture.
Recipe card

lauki muthiya recipe / no onion no garlic doodhi muthia recipe
Ingredients
For making lauki muthiya rolls
- 1 cup grated lauki
- 40 gm multigrain atta
- 40 gm besan
- 15 gm suji
- 1 tsp salt
- ½ tsp saunf powder
- ¼ tsp roasted cumin seeds powder
- 1 pinch heeng
- ¼ tsp turmeric powder
- 1 tsp ginger green chilli paste
- 1 tsp oil
- 2 tbsp chopped coriander leaves
- ⅛ tsp baking soda
For tadka
- 1 ½ tbsp oil
- ½ tsp red mustard seeds
- 1 tbsp white til seeds
- ¼ tsp salt
- ½ tsp dry mango powder
- 1 tbsp coriander leaves for garnishing
Instructions
- In a big bowl add multi grain flour, besan, suji, grated lauki, salt, saunf powder, cumin seeds powder, heeng, ginger green chilli paste, oil, coriander leaves, baking soda.
- Mix gently and form a medium soft dough. If lauki is fresh and soft you donot need any water to add in it. But if lauki does not contain enough moisture add little water according to the requirement.
- Divide the dough and make 3 logs of 5-6 inch long out of it.
- Grease a plate and place the logs on it and then put in the steamer with boiling water.
- Steam it on high flame for about 20-25 minutes.
- To check if they are done you can touch the surface if it non stick means they are cooked well. You can also insert knife or tooth pick to check if they are cooked from inside too. A clean knife or toothpick is the indication of well cooked log.
- Switch off the flame and let them cool.
- Cut into ½ inches slice sand put them aside.
- Now in a pan add oil, mustard seeds and til seeds. Then add salt and muthiya slice and gently flip them.
- Cover the pan and cook it for 2-3 minutes on a low flame. You can flip them in between for proper cooking.
- Finally add dry mango powder and garnish with coriander leaves. Transfer to a plate and serve warm. ENJOY!
Video
Notes
My latest video
Try these healthy lauki muthiya recipe, take a picture and tag it #healthically on Instagram. Or, save it for later on Pinterest. I love to see them. Happy cooking!
If you like this recipe, don’t forget to share it with your friends and family, and give us a star rating.


