Whole Wheat Marble Bread Recipe | No Maida, No Eggs & No Refined Sugar

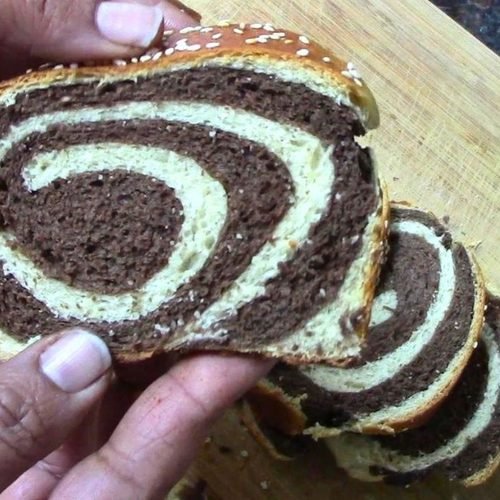
This Whole Wheat Marble Bread is a delicious homemade bread made with whole wheat flour, fine suji, milk powder, jaggery and yeast. The beautiful combination of plain and chocolate dough gives this bread its attractive marble pattern.
Ingredients
For Activating the Yeast
- ½ cup lukewarm water
- 1 tsp jaggery
- 1 tsp instant yeast
For the Bread Dough
- 150 g whole wheat flour
- 150 g fine suji
- 2 tbsp milk powder
- 2 tbsp jaggery powder
- ½ tsp salt
- ½ cup warm milk
- 2 tbsp Melted ghee
- Water as required
- The exact quantity can vary according to the flour and suji. In this recipe approximately ¾ cup water was used in total, but your dough may require slightly more or less.
For the Chocolate Dough
- 1 tbsp cocoa powder
- 1 tbsp water
For Topping
- 1 tsp Milk for milk wash
- 1 tbsp White sesame seeds
- oil or butter for greasing
Instructions
Activate the Yeast
- In a bowl, add ½ cup lukewarm water, 1 tsp jaggery and 1 tsp instant yeast.Mix once, cover the bowl with a plate and leave it aside for about 8–10 minutes.
- After 10 minutes, you should be able to see that the yeast has activated.
Prepare the Dough
- In a large vessel, add 150 g whole wheat flour, 150 g fine suji, 2 tbsp milk powder, 2 tbsp jaggery powder, and ½ tsp salt. Mix everything well.
- Make a space in the centre and add the activated yeast mixture. Now gradually add ½ cup warm milk while mixing.
- Add water little by little and bring everything together to form a soft, slightly sticky dough.
- Do not worry if the dough initially feels sticky. If it feels too tight, add a little more lukewarm milk or water.
- The amount of liquid required can vary by 2–3 tablespoons or more, depending on the quality and absorption capacity of your flour and suji.
Knead the Dough Properly
- This is one of the most important steps in the recipe. Knead the dough for approximately 8–10 minutes, using a stretch-and-fold technique.
- Initially, the dough may feel sticky, but do not keep adding dry flour. As you continue kneading, the dough will become smoother, stretchier and less sticky.
- After about 5–6 minutes of kneading, gradually add the melted ghee. Don't add all the ghee at once. Add it little by little while continuing to knead.
- Continue stretch-and-fold kneading for another few minutes. After approximately 10 minutes, the dough should become much smoother and less sticky.
- This proper kneading helps develop the gluten structure needed for a soft and spongy loaf.
Divide the Dough
- Shape the dough into a round ball and seal it properly.
- Since we are making marble bread, divide the dough into two equal portions.Keep one portion aside.
- Knead the other portion briefly and shape it into a smooth ball.Place it in a greased bowl and cover with cling film.
Make the Chocolate Dough
- Take the second portion of dough. Add 1 tbsp cocoa powder mixed with 1 tbsp water.
- Knead for 1-2 minutes until the cocoa is completely incorporated and the dough becomes smooth again.
- Shape it into a ball and place it in another greased bowl. Cover with cling film.
First Proofing
- Keep both bowls in a warm place until the dough doubles in volume.This can take approximately 40–50 minutes in warm weather, while in colder weather it may take an hour or longer.
- The actual proofing time depends on the room temperature and yeast activity, so look for the dough to double in size rather than relying only on the clock.
Remove the Air
- Once both dough portions have doubled, gently knead them once again to release the trapped air.
- This helps make the dough easier to shape.
Roll the Dough
- Grease your bread tin with butter or ghee. Take the white dough and roll it into a roughly square shape.
- If the dough is sticky, you can use a small amount of dry flour.
- Don't make the dough extremely thin. Repeat the same process with the chocolate dough.
Create the Marble Loaf
- Place the white dough on your work surface. Place the chocolate dough over it.
- Stretch the dough gently so both layers are approximately the same size.
- Now start folding the dough tightly. Make sure there are no large gaps between the layers.
- Pinch and seal the edges as you fold. Finally, close the ends properly.
- Place the prepared loaf into the greased bread tin and gently press it into shape.
Second Proofing
- Cover the bread tin with cling film. Keep it in a warm place for the second proofing.
- After approximately 30–40 minutes, the dough should become noticeably puffy and increase in volume.
- Again, the exact time depends on the temperature.
- Milk Wash and Baking
- Once the bread has completed its second proofing, brush the top with milk. Sprinkle some white sesame seeds.
- Place the bread in a preheated oven at 190°C. Bake with both rods on for approximately 35–40 minutes, or until the top is beautifully golden.
- Oven temperatures can vary, so keep an eye on the bread during the final few minutes.
Cool Completely
- Once baked, remove the bread from the oven. Run a knife gently around the sides to loosen it.
- Remove the bread from the tin and place it on a cooling rack. Brush the top lightly with butter while the bread is still warm. This gives the crust a lovely shine and adds flavour. Now comes the difficult part—let the bread cool completely!
- Allow it to cool for approximately 3–4 hours before slicing. Cutting homemade bread while it is still very hot can affect the crumb and make it appear gummy.
- Once completely cooled, slice it and enjoy your beautiful homemade marble bread.
Video
Notes
1. Don't rush the 8–10 minute kneading process. The dough becomes smoother and more elastic as you knead.
2. The dough should become visibly puffy and approximately double in size. Proofing time varies according to room temperature.
3. Allowing the bread to cool completely before slicing helps the crumb set properly.